The Promethean Classic Mark 1.0
This is the first rifle that I have designed, hopefully it should come close to rivaling the top competitors.
Specifications
| Barrel Calibre | .22 (5.5mm) |
Barrel Length |
21.65inch (550mm) |
| Power | 11.5ft/lbs |
| Weight | 2.5kg |
| Overall Length | 1100mm |
| Stock | Carbon Fibre |
| Airtube Capacity | 130cc |
| Shot Capacity | 90 shots at 200bar |
Build Log
The P22CMk1 is the first rifle that I'm building, there have been many steps to accomplish this build such as the legal issues and the rifle design itself.
17/03/2012
Starting from this date I have just uploaded this website because the rifle is nearing completion. I started the design of this rifle back in November 2010, it took me approximately a week before the design was complete. Before ordering the material I decided to seek legal advice on the construction and the sale of this rifle. I'm not going into any detail but basically I can build a rifle that complies with the firearms legislation - not exceeding 12ft/lbs of energy, barrel length no shorter than 300mm, overall rifle length no shorter than 600mm, etc... The main thing I cannot do is sell this rifle - I need to apply for certain licenses and have the rifle tested. Hopefully in the future they will be for sale and I will be able to manufacture other types to the customers preference.
At this time I decided to sell my current lathe - a Denford Viceroy. It was an ok lathe, but lacked torque and a metric screwcutting gearbox. I was also looking for a lathe with a spindle bore of 26mm so that I could use long lengths of 1inch round bar without the need to cut them down and waste material. So the lathe that I was going to by was a Warco WM250, it had a spindle bore of 26mm, 900W motor and a metric screwcutting gearbox. The lathe was constantly out of stock, so I put my name on a list and they were going to contact me when they received their shipment of lathes. It got to February 2011 and they still had not contacted me, luckily at this time I came across a bargain.
I had a total of about £1300 to spend on a lathe, and on a internet auction site I saw a lathe with a starting price of £1000. Thought I would have a quick look and it turned out it was a Harrison M280 CNC lathe, but on the description it was advertised as a manual. So straight away I phoned them up to see If I could look at it immediately, and the next morning I did, fortunately it was located 30 miles away. The lathe was massive compared to my previous lathe, about 6ft tall, 6ft wide and about 4ft deep. It was in excellent condition to say it was 20years old, the bed had no wear with the original honing. He turned it on and everything function except for the CNC, it lit up but he had no idea how to work it. So after looking at everything it came to me offering him a price, I had £1300 to spend, delivery would probably be about £300 if I could find someone and it would need a three phase inverter - £200 and then tools on top of that. The lathe was easily worth £1500 as a manual, but CNC about £2000. I made an offer of £1300 and he happily accepted it, I put down a deposit of £20 to cover the auction fees incase circumstances changed.
The hardest part was finding someone who would deliver the lathe, it weighed about 750Kg and was massive. In the end I asked the local building company, they said £20 an hour which I couldn't refuse. So 4 hours later the lathe was in my garage for £80, what made it even easier was that they had a crane, so getting it on and off the truck was easy and they even used the crane to push it into the garage. Luckily I was able to borrow the extra money and eventually bought a three phase inverter two weeks later. I'm pretty good with electronics/electrical's so I removed all the wiring and reconfigured it to single phase and installed a modern computer, I did this as my College project.
Through March I started building some of the rifles parts as I will explain later. The lathe functioned brilliant as a manual lathe but nearly useless as CNC, the motors were constantly losing steps and pretty much un-useable. At about April 2011 I got myself a job as a CNC machinist so could afford to buy some more tools and upgrade the lathe. The first thing I bought was some microstepping drivers for the motors, they cost me about £200 but the lathe then functioned excellent as a CNC. Eventually I will upgrade to another lathe with a tool turret and CNC threading capability but at the moment its fine.
Building the Rifle
Pretty much the first thing that I bought was a blank barrel. Parts for air rifles have to be sent to a local firearms dealer, but because the barrel was blank (no crown, no machining and no blueing) it meant that it could be sent straight to my house. There are two main types of barrel to consider; hammer forged and button rifled. A hammer forged barrel starts with some steel bar, it is drilled and then a mandrel is placed through the centre, the mandrel has the rifling pattern and a taper. The tube is hammered around this mandrel, the result is a barrel with a perfect bore and a taper - known as a choke, it improves accuracy. Due to the tube being hammered and shrunk it results in a compacted steel structure which is much stronger and less prone to being bent. Button rifling consists of a bar being drilled and then a button pulled through the barrel while been twisted. The button has teeth which cut the rifling profile, the barrel is then lapped - a type of surface finishing in the bore such as that of an engine bore. The barrel compared to the hammer forged one is weaker, the rifling is poorer, there is no choke and usually the barrel is not straight. Basically this method is used because its quicker and cheaper. My decision was the hammer forged barrel, BSA makes these and in my opinion the best air rifle barrel manufacturer.
While waiting for the barrel to be delivered I research barrel crowns. Look at the end of a barrel and it will have a chamfer or a recess depending on what application the gun has. The basic purpose of a crown is to protect the muzzle, many say that it is a specific angle so that it diverts the turbulent gases from behind the pellet as it exits the barrel, true but the effect is not massively significant on an airrifle. The crown is the major factor for accuracy, if it is not concentric to the bore of the barrel then when the pellet leaves the barrel it will become unstable, this is because the pellet is leaving at different times, air is escaping at one side of the pellet when the other is still in the barrel. In theory if the face of the barrel was perfectly perpendicular to the bore then accuracy would be excellent, this may sound easy to do, just stick it in a lathe and face the end of the barrel. Well do that and you will get a bur in the barrel, this needs to be removed, the only way is to create a chamfer and lap it and therefore to do this the bore must be concentric. So there are three different types of crown; target, Convex and recess.
I'm not going to explain what they all are but usually the target crown is chosen as its the most practical to machine, basically its a chamfer of 11degrees on the face of the barrel and then another chamfer on the bore - usually 45 or 60degrees. So to crown the barrel you must clock it in the lathe and turn a chamfer on the face. The bores are never concentric to the outside, my barrel had 0.1mm of runout. So to clock the bore I first made a tapered pin from brass and pushed it into the end of the barrel. Then I placed the barrel in the lathe and clocked it to this pin, I clocked it so the barrel had 0.005mm of runout. Look at the crown on your air rifle, most are quickly machined in a production line and are almost never concentric, I can see by eye that one of mine is out by atleast 0.3mm. Now to turn the crown, I set the compound on the lathe to 11degrees and faced the barrel, there is a special tool you can buy to do this - from what I've seen on the internet the finish is rubbish and they're expensive. After this I turn a step and some threads on the outside so that I can screw on a muzzle brake. A muzzle brake is a method used to divert the gases from behind the pellet as it leaves the barrel, therefore reducing turbulence and improving accuracy. I turned/milled this from brass and turned an 11 degree crown on the end of it. Pictures say a thousand words.


These are just a few pictures of the muzzle brake, there are a couple of types of muzzle brake - this is known as an Air Stripper. The pellet exits the barrel and travels through a cone, the turbulent air behind the pellet is diverted away by the cone. I have not polished any parts of the rifle as of yet just because its still a working progress, when completed everything will be a mirror finish.
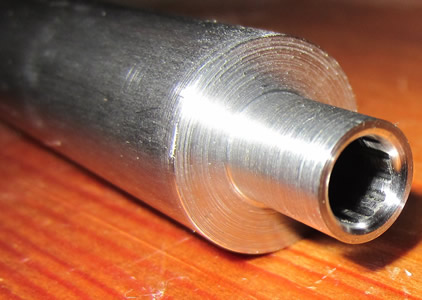
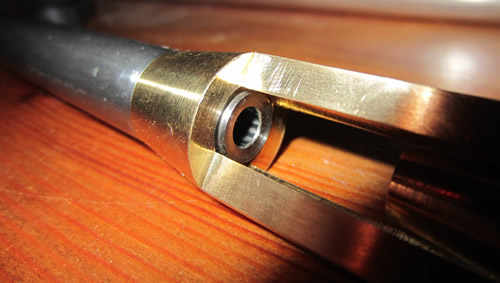
This is a close-up of the barrel where the breech will be connected to, a rubber seal will slide over this as you will see in the final assembly. The finish looks quite poor in the picture, its not as bad as it looks and isn't important either. Where the pellet is to be inserted has been polished, this rifle is intended for accuracy and therefore all burs are polished away to avoid pellets being shaved which would unbalance them resulting in the instability of its trajectory.
In the process of building the rifle I went through many designs and prototypes. Not a great deal was done on the project for a while because of various reasons, one of them was the design of the breech, just recently I think I have figured it out. So as of February 2012 the building of the rifle is going ahead again. Below are a couple of pictures of past prototypes.
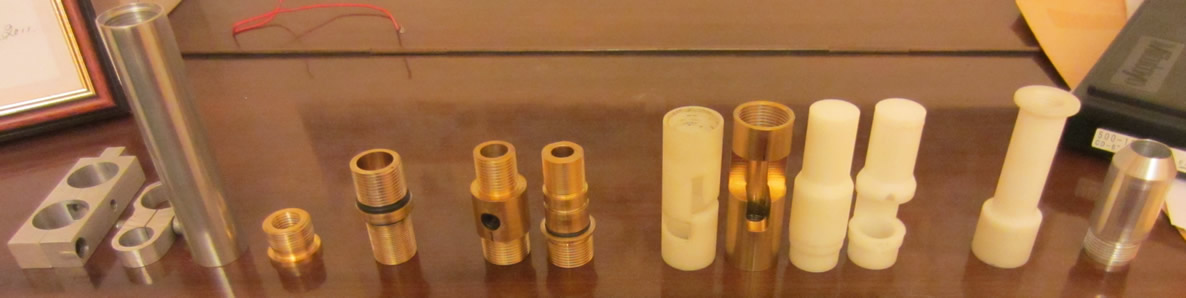
The above picture is just a handful, there are many internal parts but I don't want to give everything away.
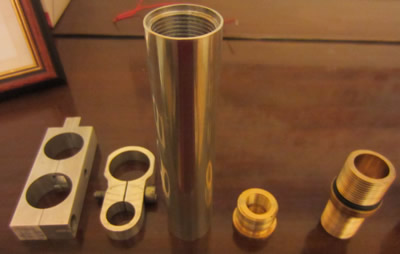
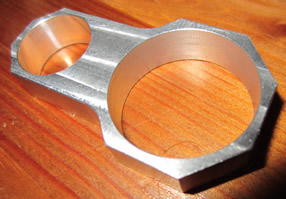
From left to right. Aluminium thing, barrel band, secondary air tube, end cap, pressure regulator, prototype valve 1, prototype valve 2, breech 1, breech 2, breech 3, breech 4. Below shows what some of it looked like assembled.
There have been many changes, one of the biggest ones was the pressure bearing parts. Originally the main airtube was to supply air to a pressure regulator to step the 3000psi source to 1000psi, this was the main reason for buying a .22 barrel instead of the .177 as it will require less pressure to achieve the 12ft/lb energy limit. Due to a change in design the pressure regulator was removed, including the secondary airtube and the valve assembly. Every part of the rifle had to be changed except for the barrel and the main airtube.
February 2012
 The key component to this rifle is the pressure transducer (sensor), its purpose is to create a voltage signal dependant on the pressure. The rifle is filled with high pressure air, when shots are fired this pressure drops, now when pressure drops the flow is reduced. If the volume of air is reducing behind the pellet then the velocity of it will reduce, the purpose of this rifle is to maintain constant pellet velocities and therefore maintain high accuracy shots. In the average rifle a balanced valve is used, as the pressure decreases the valve opens for longer, this is very hard to achieve.
With my design a computer reads the remaining pressure in the airtube, it then determines how long the valve should open for. Reducing the amount of moving parts reduces the wear, makes servicing cheaper, less often and reduces the chance of parts failing. Currently there are only three moving parts in the whole of the rifle; a part inside the valve, breech and a part inside of the filing adapter.
March 2012
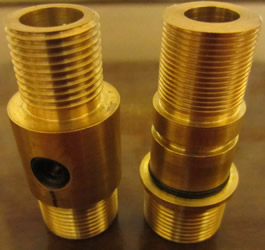
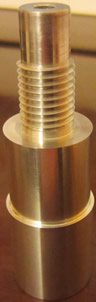
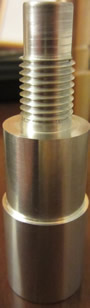
At the start of this month I machined part of the valve assembly, its the solenoid housing and made from aluminium. All aluminium parts are 6082T6 which is a reasonably high strength aluminium, the solenoid housing design has a minimum yield pressure of about 9000psi, it will be operating at 3000psi and will be tested to 4500psi. The tolerances on this part are very high because it has to function perfectly, any misalignment or slack with the mating part may result in inconsistency of rifles shots. I'm not going to show the internals of this part as I don't want to give everything away, so all you can see at the moment is the turned finish.
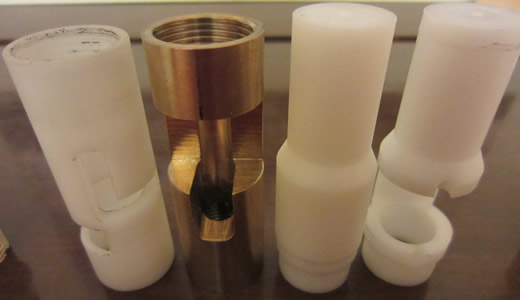
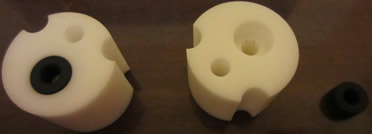
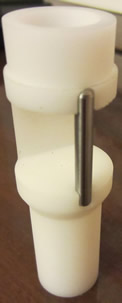 The solenoid screws into the valve and breech assembly. The valve was not so difficult to design as I already had the idea in my head, the breech was the most difficult part to design, I went through dozens of designs and about three prototypes. I finally created a design that was incorporated into the valve, the reason why the breech was so difficult to design was because air has to travel through it. There were a couple of ways to do it; make a hollow bolt, a single shot magazine or a rotary breech. All of these designs were reviewed many times over and prototypes were made, I finally decided on a rotary breech concept as shown on the left made from plastic.
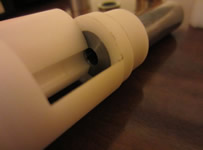
 To the right shows the breech placed into the rifle and the barrel into the breech. I have not yet machined the rotary bolt, I will first make it from plastic and then in aluminium if correct. The material has been chosen carefully on most parts to ensure the durability of the rifle. Brass has self-lubricating properties, brittle and easy to machine. The breech will be made from brass and the rotary bolt aluminium, the bolt is made from a softer material so that it wears first because it is cheap and relatively easy to machine.
 To the left is the brass breech partly machined, the last part is to cut out the slot for the rotary bolt, I have not done this yet as my milling machine needs fixing, instead I can use the one at my workplace in my own time, usually on a saturday so progress is pretty slow at the moment.
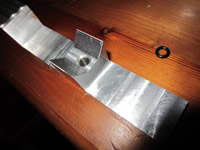
 Saturday the 16th I managed to partly machine a barrel band, this is a part that holds the airtube and the barrel together. It is vital in the design of this rifle but on many others they do not have one and have what is known as a floating barrel, I cannot see any point as its only sacrificing rigidity. To the right is what I got done, took about two hours of machining time and its still not complete, it needs a slit down the middle section, a hole and thread tapping in the side. The purpose of this is so that a screw can be tightened into it which pulls both sides together and closes it onto the airtube and barrel holding them both rigid
.
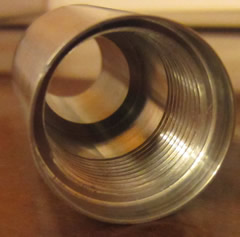
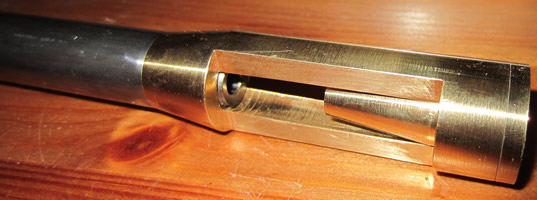
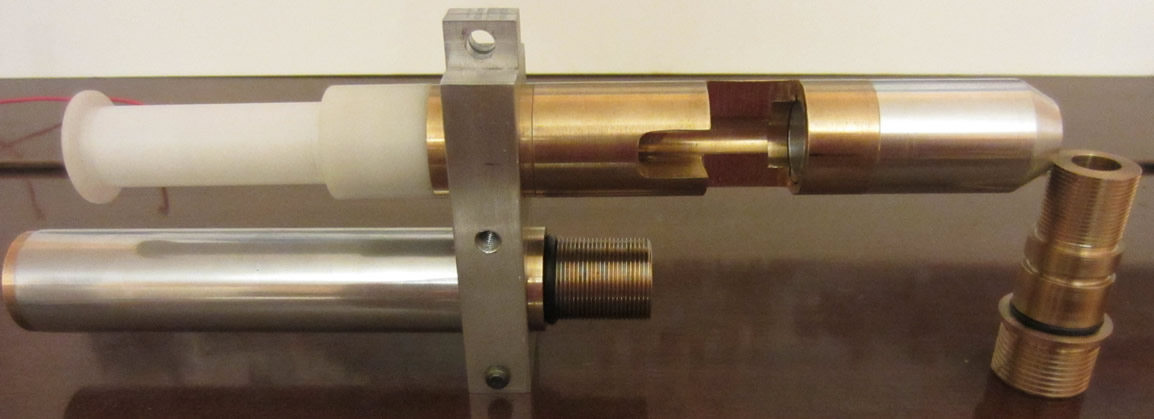
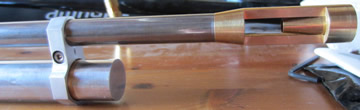
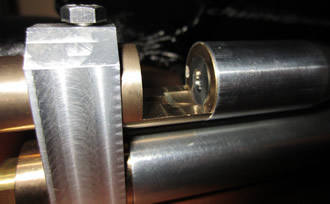
 Sunday the 18th I made another part to connect the breech the barrel. The bore is a very close fit to the barrel, only 0.05mm of clearance. There is a recess inside of this part that will hold a rubber band, the interference will hold the barrel in place. Below is a picture of what the valve and breech assembly looks like so far.
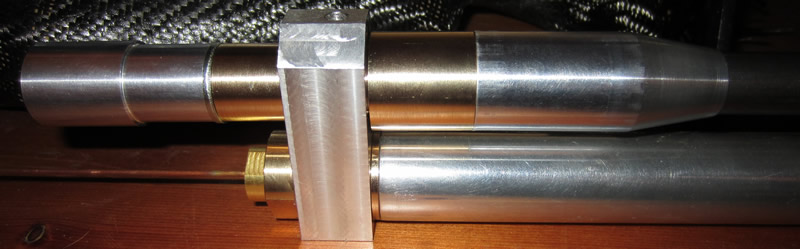
Just thought I would give a little idea of what the rifles going to look like. (Ignore the blue thing under the scope, just a spacer)
At this date the rifle is nearing completion and hopefully will be complete in under a month. The last things to complete are; the breech, the valve internals, valve solenoid, barrel band, a picatiny rail for the scope, the electronics and the stock.
March 19/03/2012
 Today in my lunch break at work I decided to machine the rotary bolt from a piece of plastic, took me about 30 minutes to machine two of them. I machined them to an accuracy of 0.01mm, it doesn't have to be that accurate but I may as well keep it up. I installed the rotary bolt in the breech prototype and tested its operation, all it has to do is line the air passage up with the barrel and allow easy insertion of the pellet. Unfortunately the pellet is very difficult to insert into the barrel without two hands and therefore I must remachine it again, that shall be a job for tomorrow. The second image shows the loading slide way lining up with the barrel. The reason why I havn't machined the slot in the brass breech as of yet is just incase something like this happens.
March 24/03/2012
 Yet again I have not had a great deal of time to get anything done except for this saturday in which I machined a little more on the barrel band. I machined a slot through the centre line and drilled a hole through the middle which was then tapped to accommodate a screw, this is so that when tightened it clamps onto the barrel and the air tube.
 The other two parts that I have machined is the valve solenoid spool and a spacer, this part should be aluminium.
The rifle is nearing completion, now only seven parts need to be machined, three of these shall be made tomorrow.
March 25/03/2012
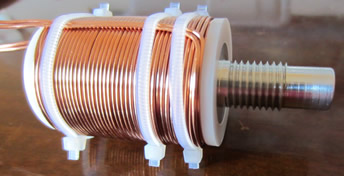 I didn't get done what I expected to today, instead I made use of the sunny weather and in the process bought some enameled copper wire to wind the solenoid spool. All I need to do now is coat it in epoxy resin, this will keep the windings together and stop them shaking when the coil is activated. I did expect to complete all of the valve internals but I made a mistake on machining a certain part and thought I would give it a rest for today.
The breech is currently being re-designed again although I'm hoping the rifle will be complete and functioning by the end of April.
March 31/03/2012
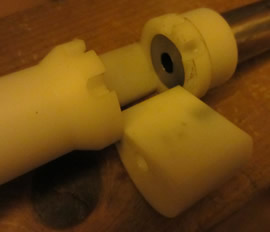 In the past I machined a couple of slots in a prototype breech housing, then machined multiple rotary segments trying to find one suitable that allowed easy insertion of the pellets and easy operation. After a lot of thought I decided that it would be impossible to keep it compact while allowing ease of loading, with it being intended for target purposes and one shot accuracy I decided to go with compact. On the left shows the prototype, it rotates on a pivot and aligns and air passage from the valve to the barrel, a tray with the pellet on will be used to assist loading.
April 02/04/2012
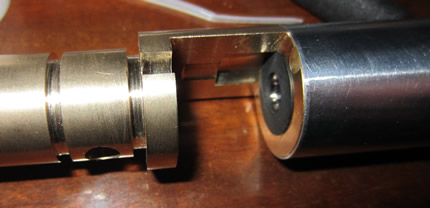
 Previously I part machined the breech out of brass ready for when I come up with the final design, a couple of days ago I decided what it should be. At home my milling machine is currently out of operation and I do not have a dividing head, therefore I have very little time for milling and I'm very limited to what I can do. In my lunch break at work I milled the rest of the breech, when I got home I installed the barrel and placed it into the rifle.
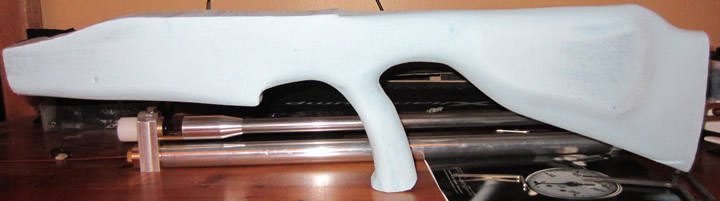 Approximately six months ago I bought some styrofoam and carbon fibre to model a stock. The first stock was modeled on the traditional style, it came out almost perfect but I managed to ruin it covering it with carbon fibre. So I had another attempt of a different type of stock, I still haven't completed it but its almost ready for covering, the rifle shall soon look like one.
Parts to complete are; stock, rotary bolt, valve internals, solenoid internals, picatiny rail and the electronics.
April 04/04/2012
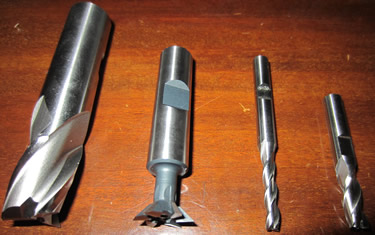 I purchased some milling cutters to aid with machining the rest of the rifle. They are HSS which is what I use to machine almost everything because the tools come extremely sharp which allows me to get an excellent finish on aluminium. The second from the left is what is known as a dovetail cutter which I will use to cut the scope rail, hopefully I will get it machined before the weekend.
April 05/04/2012
 After receiving the milling cutters I thought it would be time to make the scope rail, I bought some 1inch square aluminium bar a while back, this is what I used.
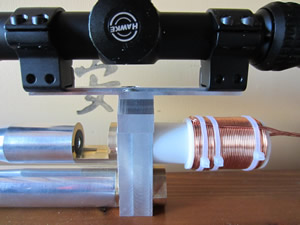
I bolted it down and milled a chunk out of the bottom, it probably took about an hour of machining time. The pictures above show the current progress, it bolts onto the rifle and aligns perfectly. The final part to machine is the rails which will be the standard 11mm pitch, I'm not working until 10/04/2012 and therefore there will be very little progress. I can finish off the rotary breech, the valve internals and maybe even the stock over the weekend, that's what I hope to do anyway.
April 21/04/2012
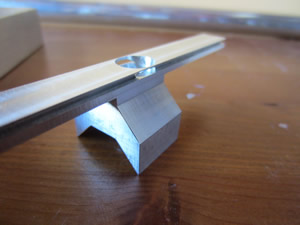
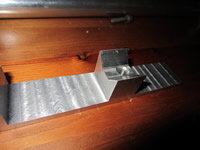
 Yet again progress has been delayed, part of that because someone at my work stole the bed crank for the milling machine. So this saturday I finally had the chance to do something. I finally finished off the scope rail, I'm a bit worried that it will be a bit too flimsy.
May 07/05/2012
 The P22CMk1 project has ended due to a massive change in design.
There was one major problem with this rifle and that was the stock. I could mould the stock to the rifle but then if an O-ring was to fail then I would have to cut it off. I could remachine a few parts and sort out the rifle but sometimes starting for scratch may be the best option, I'm even considering .177 calibre.
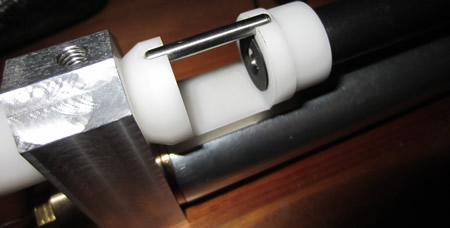
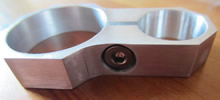
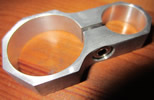
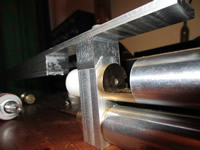
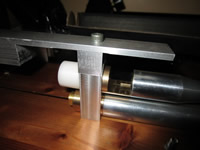
This rifle was intended for accuracy but the scope rail would let it down, if it was to be knocked or weight placed on it then it would flex slightly - certainly no good.
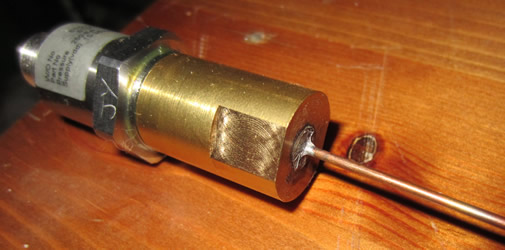
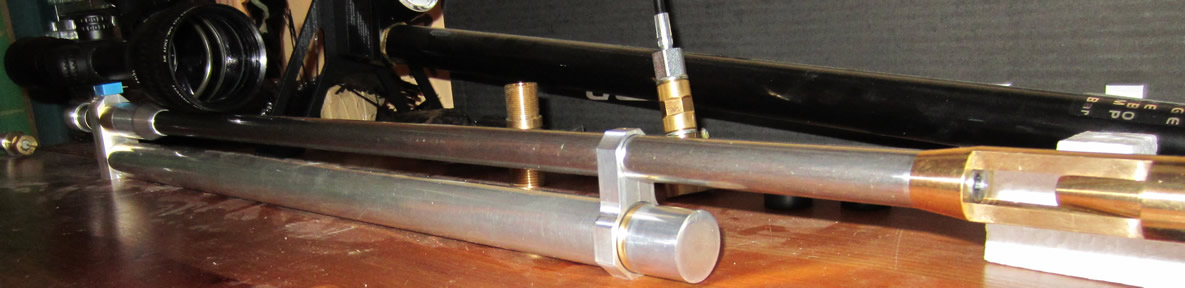
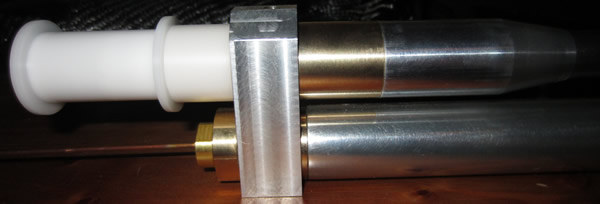
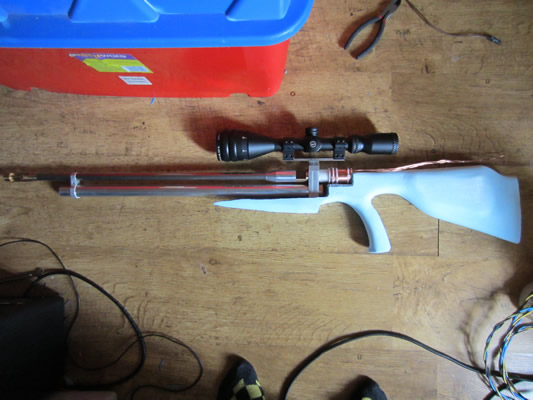
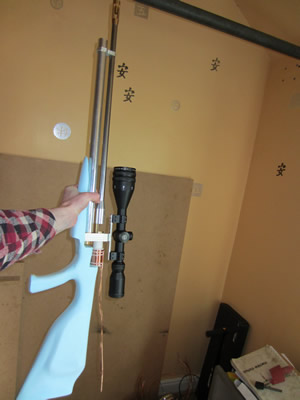
These two images give you an indication of how close I was to finishing it.
Hello, if you have enjoyed reading this project, have taken an interest in another or want me to progress one further then please consider donating or even sponsoring a small amount every month, for more information on why you may like to help me out then follow the sponsor link to the left. Otherwise you can donate any amount with the link below, thank you!