LED Dot Matrix Snake Game
Remember the games that came on the late 90's cell / mobile phones, well one of them was commonly snake. Snake was the game where you controlled the movement of a snake, by eating an apple / animal the snake grew in length. The snake could go through the boundary at the edge of the screen and appear at the opposite side. The one rule was that the snake could not run into itself or the game would be over. While a succession of eating apples made the snake grow larger it also increased the speed of it's movement.
So how do you create a game like this on a microcontroller? Well I'm sure there's all different methods of doing so but I really don't like to research these kinds of projects, part of the fun is working out a program from scratch. I'm sure that if I create a 1000 line program someone will likely be able to do it in half the space, the key point of this project is to have a working game, that's it.
Firstly there is some criteria that must me met;
Hardware
Software
Hardware
Display
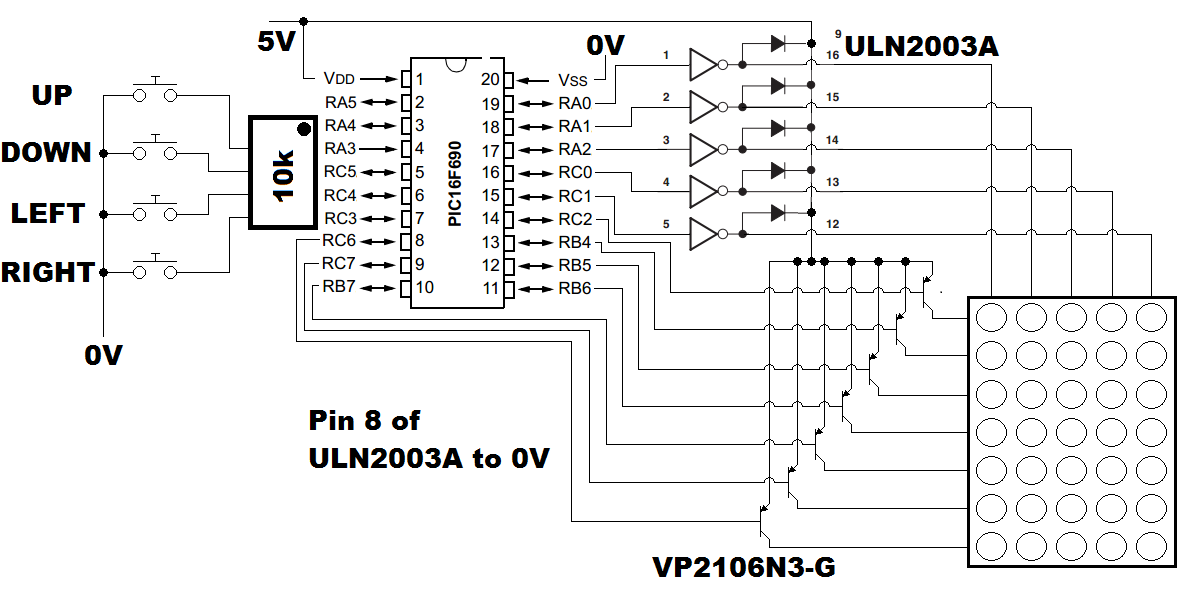
The display I will be choosing to use is a 5x7 LED dot matrix quite simply because I have this setup from a previous project. Increasing the size of the display not only requires more pins to drive it but a higher current due to the lower duty cycle of the LED's.
Buttons
The buttons will be the discrete style, they are either known as tactile or board mount. The number of buttons also depends on the design of the game. Some snake games only have one button with makes the snake take a right turn every time it is pressed, some have two, a right turn and a left turn, some games have four, up, down, left and right. For this game I will choose to go with four buttons.
Microcontroller
The microcontroller I have chosen for this project is the 16F690 as it just has the right number of pins, no external crystal needs to be present as the 4MHz internal resonator is sufficient for this game.
Software
The software is the difficult part, there are some basic sections which are required for the game to work.
LED Matrix control
Button Detection
Snake path memory
Snake path collision
Snake eat apple
Snake body length
Snake Speed
With all of these factors in mind this is how I propose the system to work;
A variable will be assigned to every single dot for the display working as a counter.
A special variable will log how many segments the snake has.
When the snake travels over a dot it will load the register with the quantity of snake segments and illuminate that dot.
A interrupt timer will tell the snake when to increment position, this will subsequently decrement all of the registers containing the quantity of snake segments. For example if a variable was loaded with five the LED will illuminate for five increments of the snake position, after that the register reaches zero and the LED turns off.
A random generator will illuminate an apple, only in a clear register, when the apple has been collected it will wait another 10 timer cycles until the next apple illuminates. An apple will increase the snakes length by one but also decrement the timer interrupt increasing the snakes speed.
A section of program will be able to determine whether the snake eats an apple or collides with itself, this will either increase the snakes length and speed or end the game.
The Circuit Diagram
The 10k is a resistor network that has the common connected to RA4 which supplies the pull-up voltage. No resistors limit the current to the LED's since the voltage drop from the transistors and the ULN2003A already achieve this. Even though the PNP transistors are transistors in the diagram the VP2106N3-G is infact a P-channel MOSFET.

Hardware
Here is the layout on a breadboard, since I don't use these matrices all that often it is quite likely that I will place the whole thing onto a circuit board.
Software
Here is the program as a picture or here is a - Text Version
I hope that the structure of the program is clear enough, I have annotated some parts but tried not to clutter the program. The program first initialises all of the ports and the interrupt timer, a start position is loaded into a set of variables that states where the snakes head is, this is also loaded into the display variables. A program is called to see if a directional button has been pressed, if so the snake will start moving, the game has begun. The button program will check which direction is asked, if it is already moving up then it cannot move down as a collision will occur, the same from left to right and vice versa.
The display will continue to loop until the interrupt timer flags in which it will increment the snakes head. The position of the snakes head accesses a register in which the contents of the snakes body length are placed, this is only a temporary variable and saved for later. The display output variables are all set high. The next program reads through all of the LED registers to check their contents, it first decrements the register, if a carry flags then the contents were already zero, the contents are placed back to zero. The remaining information is checked, if there are still contents then the register is ignored, if there are no contents then the corresponding display output variable is cleared.
The program then loads up the snakes head position, the temporary file we saved earlier. Before placing the snakes head to the output variables it is first checked to see if it's corresponding LED has contents, if not then the contents are loaded to it's register and the display variables. If it has then a collision has occurred, a bit is checked in the variable to see if it's an apple we've collided with or the snake itself. If it's the snake then we set an indicator variable, when it returns from the interrupt the game will then cease by flashing the snakes fatal position eight times before resetting to the beginning.
If it's an apple then we increase the snakes length by incrementing it's variable and we also increment the timer interrupt variable, this decreases the interrupt time and therefore increases the snakes speed. The position where the snake is selects the corresponding LED variable, it is then loaded with the snake body length variable and returned from the interrupt.
On interrupt an apple variable is incremented, when incremented a total of ten times it will instruct to place an apple for the snake. The position of the apple is determined from the snake position (we can't place it in the snake) and it's body length to call up a position value from a lookup table. The apple counter will not count any further until the apple is eaten, a bit is set in the apple variable to show an apple is still present. A bit is also set in the LED position variable to indicate an apple has been placed and not the snakes body. Since all the LED position variables decrement it means that the indicator may shift, the apple goes bad and acts like a normal collision.

The Result
Here is a video of the program working, the placement of the apples seems to be random enough and the speed increase is enough to increase the difficulty.
PCB
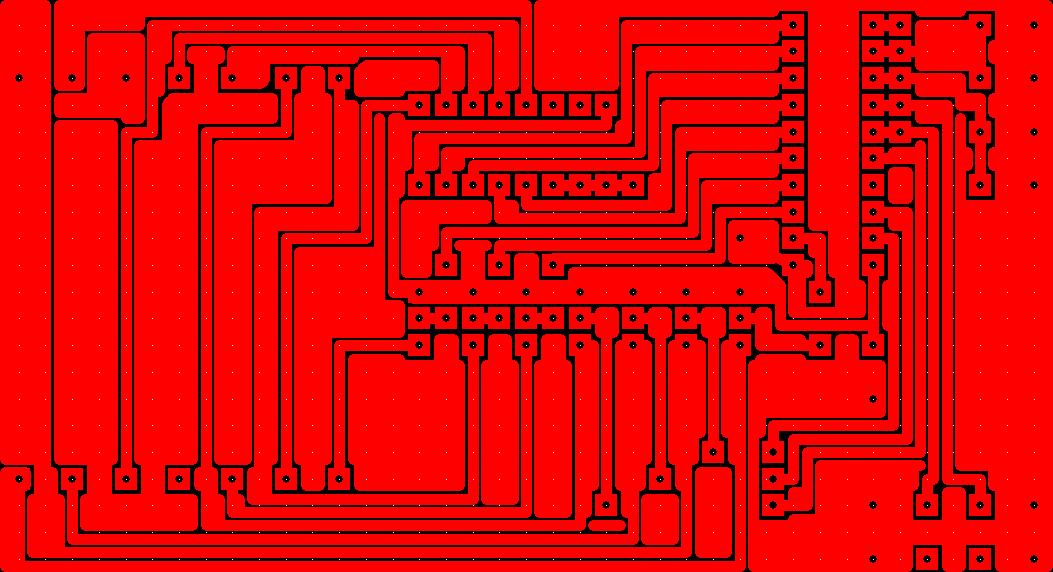
Is there much point in placing this onto a circuit board, well probably not, but (at the time of writing this) I have recently got a PCB etching kit. Since the cost and speed of doing my own boards is pretty low it gives me the chance to perfect my PCB design and etching skills. Firstly a design is needed, I choose to design these things in my head and then compare the circuit diagram and the pin layouts of the chips to my design. If all is good then I will proceed to manufacture, mistakes can still be overlooked but are normally easy to resolve on small scale such as this. Since I define symbols as pins in the program it makes it a lot easier to swap port and pins without having to change the main program. I routed the traces the best I could to reduce the number of flying leads, this meant jumbling up the ports which was no issue.

Here is the PCB etched, the whole process probably took around 30 minutes, this was developing, etching and tin plating the board. The reason for filling all the gaps in the design is to etch as little copper as possible, it extends the life of my etching solution.
The drilling is done by hand using a dremel, a 0.8mm suffices for most of the components, ideally I would use 0.6mm but these don't last nearly as long. The drill bit I used was quite blunt which can be seen by the burrs on some of the holes, it doesn't affect the soldering at all.
Soldering the board is probably my favorite task, I don't think the tin plating really makes any difference to the soldering but it doesn't tarnish as easily as the bare copper would.
The top of the complete board. Since I had to alter the port assignments in the program it did add the possibility of error. I was pretty confident with the design and the program so I did not bother with a chip holder and soldered it directly to the board. Thankfully there were no errors in the design or program as the game works perfectly.
The Final Video
One last final video of it working on a board. - Video will change soon as this is a duplicate of the previous.
I will be doing a couple of game projects in addition to this, one of those will be a snake game using a graphic LCD with a scoring system. If your interested in building the circuit board version then just ask and I will add a link to the revised program and PCB design. Please check out my other projects!
Hello, if you have enjoyed reading this project, have taken an interest in another or want me to progress one further then please consider donating or even sponsoring a small amount every month, for more information on why you may like to help me out then follow the sponsor link to the left. Otherwise you can donate any amount with the link below, thank you!